Mechanical temperature control switch wiring method
Keywords: mechanical temperature control switch
The thermostat is an instrument that controls the temperature. Its accuracy is very good, so the temperature control is very accurate. It is widely used in a variety of large industrial plants. It is also used in some large shopping malls and is rarely used in our residential buildings. The mechanical thermostat is an automated thermostat that is easier to use and does not require our own hands-on operation. The wiring method of the mechanical thermostat is also very complicated. Let's introduce its wiring method.
Mechanical thermostat wiring method:
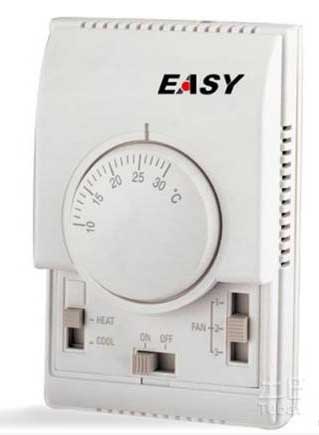
Uses: Control central air conditioners, end fans, water valves, etc., used in hotels, office buildings, shopping malls, industry, medical care, especially villas and other civil buildings. The controlled so that a constant ambient temperature is within a set temperature range. Thermostat with a remote control section, which can be controlled remotely.
Features; four working modes: cooling / fan / heating / automatic;
Indoor fan can be adjusted: high speed / medium speed / low speed / automatic;
Set by jumper: single cold / cold / warm two tube / cold and warm four tube and other modes; Two-wire electric valve or small air valve can be controlled;
LCD display system working status: at a glance;
The LED indicates the operating state and the power-on state of the two-way valve;
Set the temperature to increase/decrease by 1 °C: higher precision;
Infrared remote control function: (optional)
Temperature head fault alarm function: error prompt;
Real-time clock display, week-time switch
Multi-color backlight: (optional)
Room temperature correction function specification rated working voltage / frequency: 220VAC ± 10% / 50Hz;
Load current: <3A;
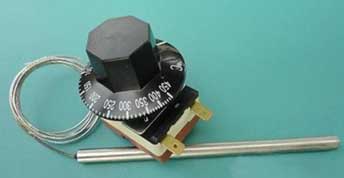
Working environment: 0°C~+60°C temperature control accuracy +1°C Temperature control setting 16°C-300°C external dimension 86&TImes;
15 Installation instructions:
1. Please install it by professional technicians. Please confirm that the power has been cut off before installation.
2. This product should be installed in a normal temperature environment with good air circulation, away from heat sources, away from doors and windows to avoid direct sunlight;
3. Mounting screw hole spacing: display panel: 60mm;
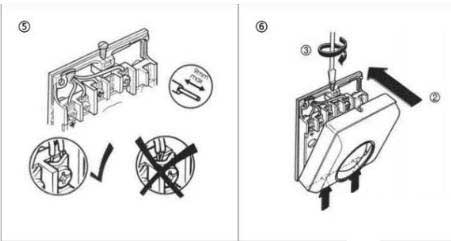
4. The installation steps are as follows:
(1) Fix the strong electric wiring according to the wiring diagram;
(2)separate the display panels;
(3) Install the power board with the strong wires installed on the wall according to the installation diagram;
(4) Connect the 7-core cable;
(5) buckle the display panel cover;
Reverse YCK200A/205A Series LCD Thermostat Operation Guide Query the room temperature and press the set button once.
LcD displays the room temperature. For example, the room temperature is 25~C. Do not press any key for 5 seconds or press other function keys to exit the l query status.
II Query or modify the machine number (only for networked models) Connect the Set button twice to enter the query or modify the status. Press the temperature button to adjust the machine number (0-99). After 5 seconds without pressing any key or pressing other function keys, you can exit the query or modify the status.
III Modified time l
1, adjust the week: press the set button three times in succession to enter the adjustment week state, press the temperature up and down keys to adjust the week, such as Sunday.
2, adjust the clock: Press the set button again to enter the adjustment state, press the temperature up and down keys to adjust the clock (24-hour system) shown at 14 o'clock in the afternoon.
After 5 seconds without pressing any key or pressing other function keys, you can exit the setting state.
IV Set the day of the week to switch on and press the set button five times. You can enter the day of the week to set the state, press the temperature up and down keys to adjust the timing time. A timed start time and a timed off time can be set each day, and a total of 14 switching times are required for one week. After setting a certain time, press the SET button to confirm and enter the next time setting. For example, you can exit the setting after 5 seconds without pressing any key or by pressing another function key.
V Set the day delay enable status and press the Set button continuously. When the LCD displays "Clock Set" at the same time, it can enter the set week timing enable status. Press the temperature rise button to adjust the enable state of the timed power on. Press the temperature down button to adjust the enable state of the timed shutdown. The time for the time switch is valid.
The thermostat is an instrument that controls the temperature. Its accuracy is very good, so the temperature control is very accurate. It is widely used in a variety of large industrial plants. It is also used in some large shopping malls and is rarely used in our residential buildings. The mechanical thermostat is an automated thermostat that is easier to use and does not require our own hands-on operation. The wiring method of the mechanical thermostat is also very complicated. Let's introduce its wiring method.
Mechanical thermostat wiring method:
Uses: Control central air conditioners, end fans, water valves, etc., used in hotels, office buildings, shopping malls, industry, medical care, especially villas and other civil buildings. The controlled so that a constant ambient temperature is within a set temperature range. Thermostat with a remote control section, which can be controlled remotely.
Features; four working modes: cooling / fan / heating / automatic;
Indoor fan can be adjusted: high speed / medium speed / low speed / automatic;
Set by jumper: single cold / cold / warm two tube / cold and warm four tube and other modes; Two-wire electric valve or small air valve can be controlled;
LCD display system working status: at a glance;
The LED indicates the operating state and the power-on state of the two-way valve;
Set the temperature to increase/decrease by 1 °C: higher precision;
Infrared remote control function: (optional)
Temperature head fault alarm function: error prompt;
Real-time clock display, week-time switch
Multi-color backlight: (optional)
Room temperature correction function specification rated working voltage / frequency: 220VAC ± 10% / 50Hz;
Load current: <3A;
Working environment: 0°C~+60°C temperature control accuracy +1°C Temperature control setting 16°C-300°C external dimension 86&TImes;
15 Installation instructions:
1. Please install it by professional technicians. Please confirm that the power has been cut off before installation.
2. This product should be installed in a normal temperature environment with good air circulation, away from heat sources, away from doors and windows to avoid direct sunlight;
3. Mounting screw hole spacing: display panel: 60mm;
4. The installation steps are as follows:
(1) Fix the strong electric wiring according to the wiring diagram;
(2)separate the display panels;
(3) Install the power board with the strong wires installed on the wall according to the installation diagram;
(4) Connect the 7-core cable;
(5) buckle the display panel cover;
Reverse YCK200A/205A Series LCD Thermostat Operation Guide Query the room temperature and press the set button once.
LcD displays the room temperature. For example, the room temperature is 25~C. Do not press any key for 5 seconds or press other function keys to exit the l query status.
II Query or modify the machine number (only for networked models) Connect the Set button twice to enter the query or modify the status. Press the temperature button to adjust the machine number (0-99). After 5 seconds without pressing any key or pressing other function keys, you can exit the query or modify the status.
III Modified time l
1, adjust the week: press the set button three times in succession to enter the adjustment week state, press the temperature up and down keys to adjust the week, such as Sunday.
2, adjust the clock: Press the set button again to enter the adjustment state, press the temperature up and down keys to adjust the clock (24-hour system) shown at 14 o'clock in the afternoon.
After 5 seconds without pressing any key or pressing other function keys, you can exit the setting state.
IV Set the day of the week to switch on and press the set button five times. You can enter the day of the week to set the state, press the temperature up and down keys to adjust the timing time. A timed start time and a timed off time can be set each day, and a total of 14 switching times are required for one week. After setting a certain time, press the SET button to confirm and enter the next time setting. For example, you can exit the setting after 5 seconds without pressing any key or by pressing another function key.
V Set the day delay enable status and press the Set button continuously. When the LCD displays "Clock Set" at the same time, it can enter the set week timing enable status. Press the temperature rise button to adjust the enable state of the timed power on. Press the temperature down button to adjust the enable state of the timed shutdown. The time for the time switch is valid.


